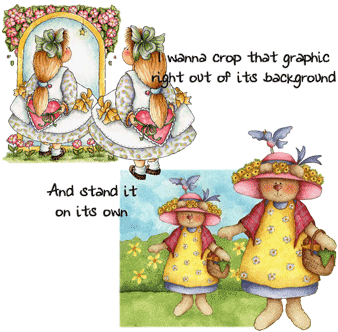
Example:
YOU SHOULD NOT CROP OUT AN IMAGE AND "TUBE"
IT and/or Create graphics and/or
anything Downloadable (such as sigtags)
(where someone would obtain the image and be
able to use it for their own purposes) from
such Images and offer them in Sigtag or
Graphic Sharing Groups!!! Such Image usage
is usually for personal use only. Please
READ and UNDERSTAND the RULES for any/all
graphics that you either purchase and or
find free online. If you don't understand or
the rules or terms of use are not clear,
please contact the artist, or company that
you obtained images from to find out exactly
what can or can't be done with their
graphics.
I am NOT affiliated in any
way with pcCrafter.com, and I
am NOT a Professional Crafter
who creates items for sale using the
Graphics I purchased from pcCrafter.com.
Please also note
that the following screen shots and
information on how I do things using my
software (Microsoft's Digital Image
Pro version 10) are my experiences and
current methods.
You
may find different ways using other tools or
methods in the program to accomplish the
same goal.
For
the examples below I have not used the Smart
erase, blending brush, or cloning tools with
much success, but your own experimentation
with those tools may make the tasks of
removing a background from around an image
much easier.
**Update April 2008 - see
below - new screen shots
showing that I now may use the Edge
Finder and other tools such as Magic
Erase, and the Clone Brush
Don't
be afraid to try other ways or work arounds.
Explore the tools and effects, etc. that the
Microsoft line of imaging software programs
offer.
Update 2015: I currently use MS Digital
Image Suite 2006 (which I would use the same
tools and features to do the steps I
describe here on this page with MS Digital
Image Pro 10), as my go-to program when
working with clip art and digital scrapbook
elements etc. But I also have installed on
my computer Adobe Photoshop 7, Adobe
Photoshop Elements 8 and 11, Jasc's Paint
Shop Pro 8 (PSP is now made by Corel.com),
and the Free program of Paint.net.
I am using ALL of these programs on
both my Windows 7 and Windows 8.1 computers.
**Please note: as of May 2007 Microsoft has
DISCONTINUED their Digital Image Line, it now
can only be found at select outlets such as
Ebay or Amazon, etc.
The Basics of how I remove
graphics or images from a background
REMEMBER
FIRST DUPLICATE THE WHOLE IMAGE AND WORK
ONLY WITH DUPLICATES, DO NOT CHANGE
ORIGINALS. Name & Save your newly
created images to folder or location on your
own computer (or external drives etc.) that
you will remember and associate with such
images
Just
be Patient and work with your image slowly
refining your techniques and skills.
Tips:
When
you want to switch tools or working on a
different graphic in your Stack area in the
workspace (the Stack area has all current
Layers that are on your workspace canvas)
click
on the "arrow" Select tool - that tool
"selects" - then click on the graphic in
the
Stack (the Stack has all/any graphics or
portions that make up the current graphic or
graphic compilation on your workspace
Canvas) or click on a new tool - such as the
Magic Wand or the Marquee freehand select
tool, etc. Clicking on the Select arrow also
turns off a previously used tool till you
select it again.
You can
always "undo" or back steps, by pressing
your keyboard Control Key and the letter
Z - and you can undo as many steps as
you would like. Digital Image Pro saves
every step and changes you make to a
graphic on the workspace canvas.
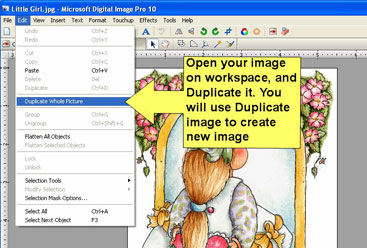
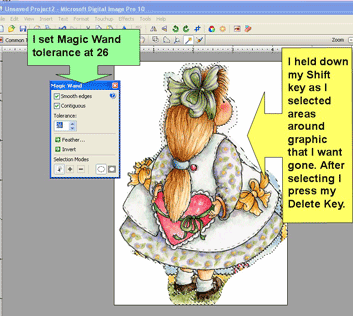
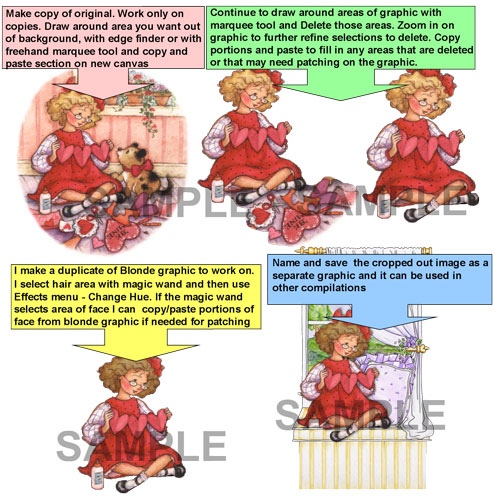
1.
I open image in program and duplicate it,
and use the duplicate image to work on and
create my stand alone image. ALWAYS Work
with Duplicates or Copies, NEVER CHANGE
ORIGINAL Graphics!!!!
2.
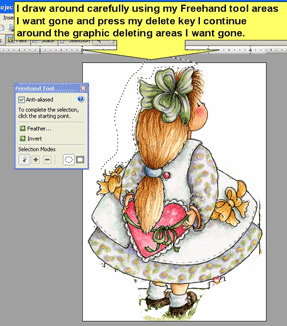
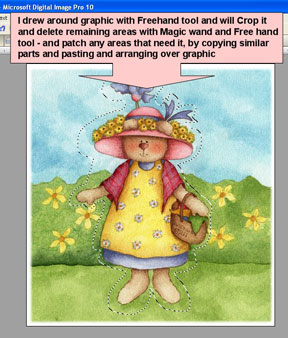
I use the Freehand tool and draw around the
figure that I want out of the background.
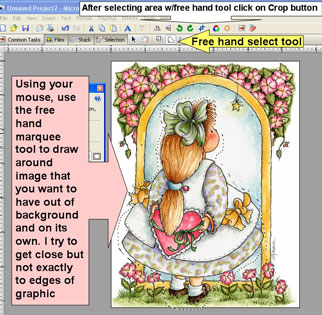 I can zoom in on the graphic and
try to draw as close to the edge(s)
surrounding graphic - You may also use the
edge finder tool to draw around image if your
prefer.
I can zoom in on the graphic and
try to draw as close to the edge(s)
surrounding graphic - You may also use the
edge finder tool to draw around image if your
prefer.
3.
When I have finished drawing around the
image, I press the "Crop" button tool.
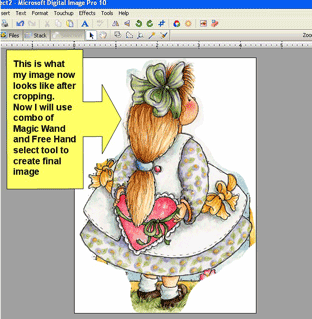
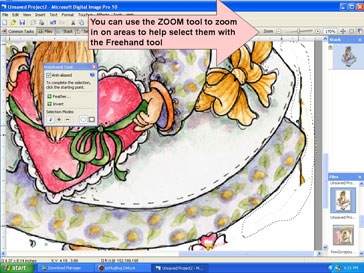
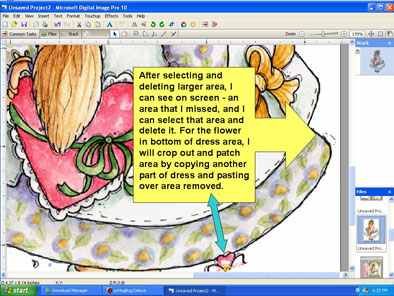
4.
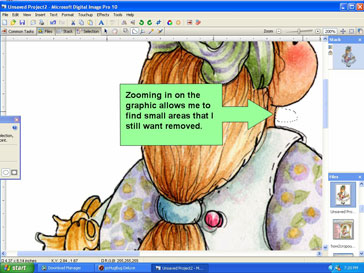
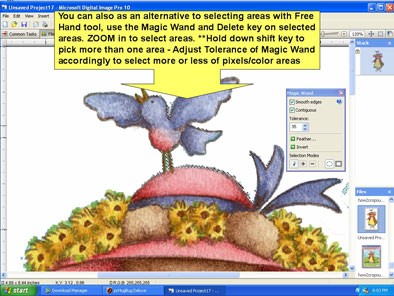
Next - using the zoom tool - I zoom in on
the graphic and using a combination of the
magic wand and the free hand select tool - I
draw around areas, or choose with magic
wand, the areas that I want gone, and
then press my delete key.
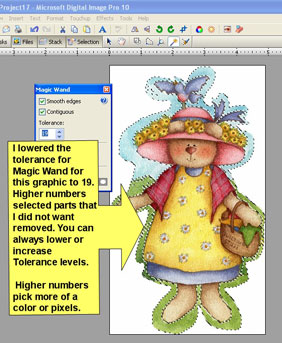
Tips: If your magic wand selects
too much, lower the tolerance setting. If
there are any broken lines on the graphic, the
magic wand may bleed through the outline edge
of the graphic to the inside.
Either lower the tolerance to see
what it selects, or if it still selects too
much or inside the graphic, you can
delete the portions you want
using free hand marquee tool - draw around
area and delete it. Or you can also free hand
draw a line on the area you need to close up,
group the line and graphic together, and then
use Magic wand. Also note: sometimes selection
by the Magic Wand, may leave stray outlines of
the areas selected, for those lines or areas I
just draw around those areas with free hand
marquee tool and delete them.
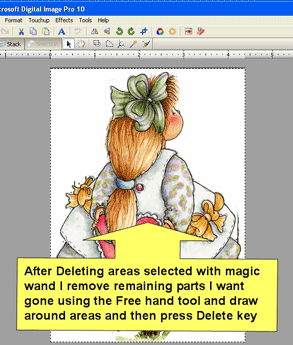
5.
For areas I graphic that I may have to patch
or fill in - I draw around similar areas in
the graphic with free hand select tool and
copy it, then "paste" it, and move it and
arrange over area that needs patching.
If
needed I can flip or rotate or stretch these
copied / patch pieces to fill in specific
areas.
I
can place these pieces behind the graphic,
if needed for a better effect.
**To
place a graphic or small pieces etc. in
front or behind in a graphic compilation, I
use the Format menu - selection of Move to
back, Move forward, etc.
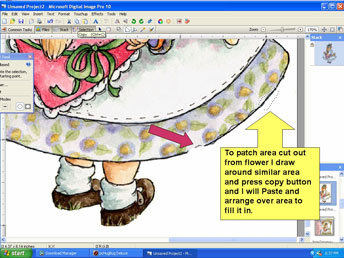
To patch or fill in an area that
was removed or needs to be covered:
Trace around similar areas with
free hand tool on the graphic and press your
copy button or your keyboard control key
and the letter C for copy, and then Paste the
copied portion and move over and arrange on
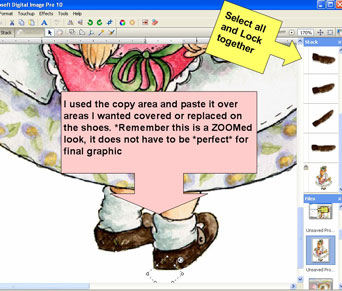
spot that needs filling in or patching.
**In
this image example I patched an area on the
skirt, and also copied parts of the shoes
and pasted over shoes where grass blades
were.
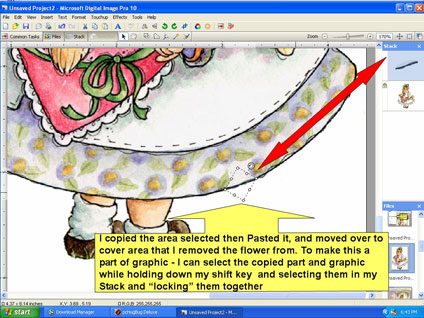
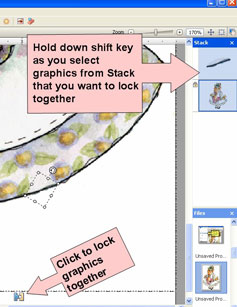
To group any/all pieces of a
graphic, I select them while holding down my
keyboard Shift key and select each in my STACK
- and lock them together or you can use
shortcut keys of pressing your keyboard
Control Key (Ctrl) and the letter G (for
group)
or
use short cut of pressing your keyboard
Control key and the letter G for group
I look over entire graphic
edges, zoom in and remove any areas to
give a clean
look
to the imge
6.
When I happy with my graphic, I name and
save it to a folder of my choosing that I
will associate with these graphics. You may
if you choose save these images to the same
Painted subfolder of the actual Creatable /
Collection you have original in.
Always
be sure to save the image with a different
name than the original, and save in either a
gif or png format to retain its
transparency. If you save your image as a
jpg format it will have a white box around
it.
Now
I can use the graphic in other graphic
compilations
this
is my :
Goldilocks
meets up with one of the 3 Bears to exchange
Valentine Gifts

Bear and Girl from My Honey by Rebecca Carter
- Creatable
*Background
from the
Honeyville CD collection by Gina Jane
Gina Jane now sells her
clip
art at DaisieCompany.com
Here
are 3 more screen shots showing the same
process -
this
is from Daisy
Bear creatable
image by Lori Gardner
Other
examples:
Bear from the pcCrafter creatable > Teddy Bears by
Rebecca Carter
I
had to do some "piece" work to patch in
the parts of the dress that were cropped
out when I took the small bear out in
front. And I also had to add some feet!! I
got the feet off the angel bear holding
the hearts garland in the same
creatable.
More examples
Graphics examples:
Rabbit holding basket of flowers
is from the pcCrafter creatable "Rabbit
Garden"
Girls sitting on Bench is from
pcCrafter creatable "Forever Friends"
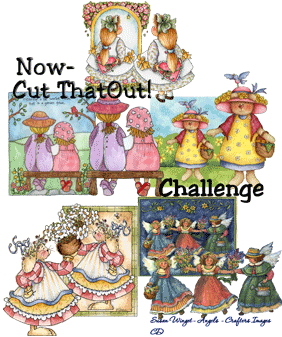
Angels are from a Susan Winget
Crafters Images CD
> Angels
Note - Crafter's Images graphics
may only be used on personal or gift items and
not for items intended for Sale.
The
Crafter's Images line by Blumenthal, of
CDs are NO
longer available
- you may find them on ebay from time to
time.
January 2007
For
this example I used a graphic from the
pccrafter creatable>
Love Through the
Garden by Tina Wenke
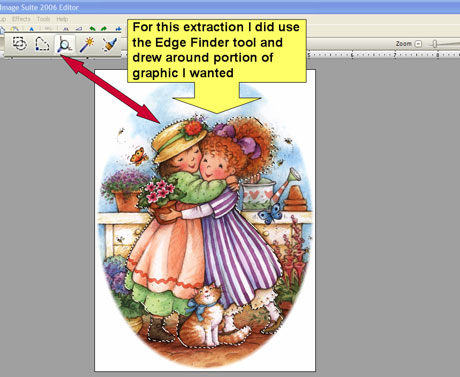
April
2008 update, as I learn more, and experiment
more with the tools in Digital Image I wanted
to share my experiences.
(*for these screen shots, I am
using Digital Image Suite 2006)
For the following I did use the
Edge Finder tool, and the Clone brush tool, as
well as some of the same methods mentioned
above to crop out and create standalone
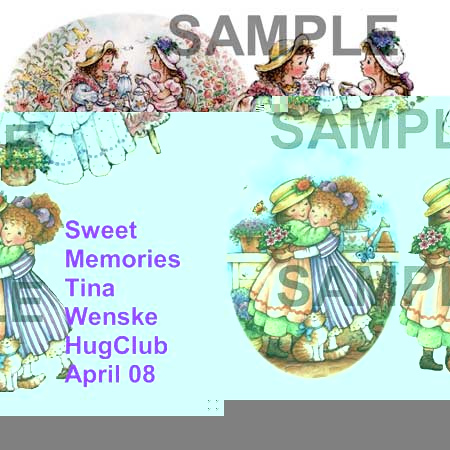
images **image
from: pccrafter creatable Sweet Memories by
Tina Wenke
1. I used Edge Finder tool
and drew around the figure I wanted to
extract or make a stand alone image
ofI
didn't try to be exact, as I still use the
free hand tool etc. to draw around
specific
areas to remove or help clean up the
image.
I
draw around image, then click on the Copy
button,
and
then click on New Document and Paste the
copied portion.
2.
I next follow the same steps I used above
to delete, portions, and or copy and
arrange
portions
to flesh out the full graphic
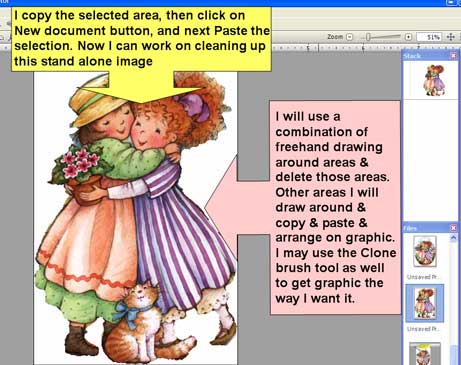
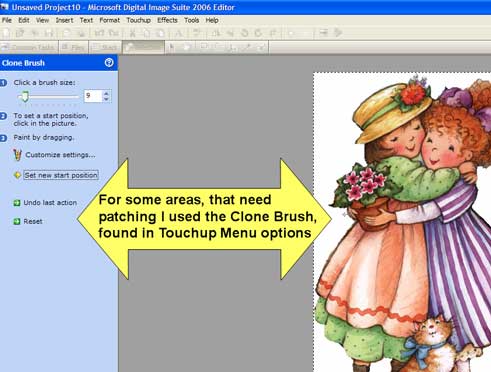
3. For some areas, I am
learning how best to use the Clone
Brush.
Set
the Start position
in
the area you want to copy or clone, then
click in the area
you
want that copied/cloned area to appear on
the graphic
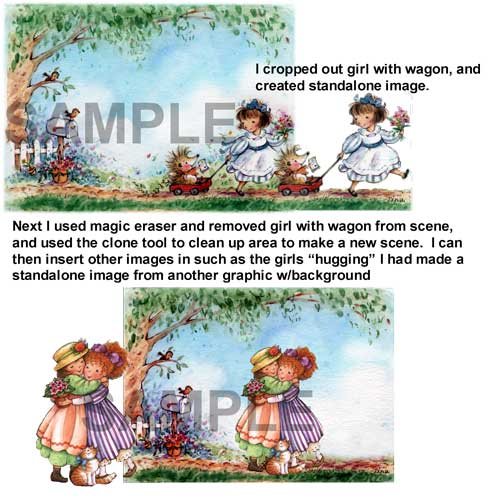
The
following are 2 examples of extracting
images from their background
On
the Girls at the Tea Table, I first drew
around the image
and
pasted on new Document.
Then
I drew around one plant near left hand
edge and deleted it.
Next
I drew around lower portion of table cloth
on right hand side of table
and
copied
it, pasted it, flipped it, so it was
oriented on the left
and
positioned it below the image (put it as
the bottom layer)
to
cover the area
where
I had removed the one planter graphic.
From
there I continued to work on the graphic,
cleaning it up,
cloning
parts, copying and pasting parts etc.
*Note: I spelled the
Artists name wrong in the screen shot -
this is artwork by Tina Wenke
I
also Extracted an image from a background,
and saved image as standalone image.
Next
using a Duplicate image of the figure in
background, I then I used the Magic Eraser
tool
and
drew
around the figure, and pressed the magic
eraser tool. That action filled in the
area.
But
it still needed a bit more clean up and I
used the Clone Brush tool for that
Please note that when you
remove an image from a background, and
copy it, and paste on a blank new
document, that the background in Digital
Image is White but it is actually
"Transparent" (in other programs the
transparent background pattern is a
gray/white checkerboard, but in Digital
Image it is White)
So
I often times to double check my work or
refine my standalone image, I place a
colored rectangle or square behind the
image and then do my extra clean up on it
against the background.

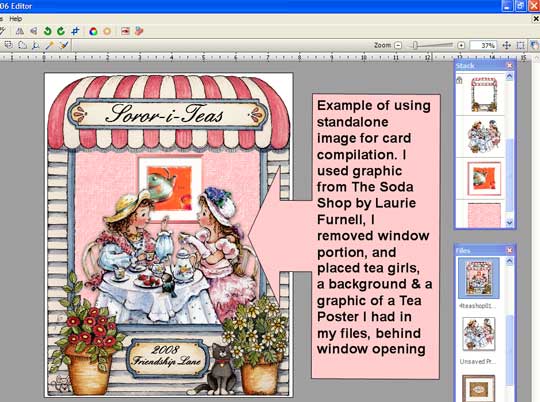
Just another example of using
a standalone extracted image in a new
compilation
I
am planning on using this image for a
card front for my sister's birthday in
May.
as of 2011
pccrafter.com is no longer in business. The majority
of their former artists
no longer sell downloadable Clip
Art collections online.
Check
out this >> blog
post << - where I list the
known
former pccrafter artists who sell their
clip art online
Please
note that all copyright, graphic usage and
angel policies apply to any images that you
remove from a background, just as they do to
the original graphic.
Even
though PCCrafter
is NO LONGER in business, all
copyrights are retained by the individual
Artists of the clip art. And all Terms of Use and
Angel Policies remain in effect on
any graphics downloaded and
installed from pccrafter.com.
to top of page
This
page created by Mary, Feb. 2006,
updated January 2007, April 2008
Updated 2015 :
I have recently purchased a Cricut
Explore machine,
this particular model of the Cricut
line, still uses
Cricut Cartridges, but adds in
features of allowing owners
to upload their own images to the
online only software program of
Design Space.
So now I can take images
like those,
I have extracted from a background
&
upload them to Design Space, and
working in Design Space,
I can set the Explore to cut out
the extracted image precisely.
I made a webpage showing how I
extracted some images from their
background,
from the pccrafter
creatable Rabbit Garden
by Rebecca
Carter
and also made card fronts with the
images and their backgrounds
and cut both out with the Explore
machine.
I also used the FREE software
program of Paint.net to extract
the
images vs using my MS Digital
Image program.
I still prefer using Digital Image
for almost everything graphic/clip
art/photo related. But I am always
testing out other software
programs I have installed and also
want to learn their own features
and capabilities, that Digital
Image might not have.
I made a webpage showing my
experience with extracting images
using Paint.net & also Digital
Image to create the compilations,
in conjunction to using the
Cricut Explore to cut the
images out.
http://sippingtea.com/tuts/cardscutwithcricutexplore.html
Note:
The Cricut Explore is the
only machine in the current Cricut
cutting machine line, that allows
for cutting your own uploaded
images, and use your own fonts, as
well as allows for uploading SVG
files from 3rd party sources.
But it does require that you be
connected to the Internet, and use
the ONLINE ONLY software program
of Design Space in order to get
the Explore machine to work.
Other
cutting machines (the Silhouette
Cameo, Pazzles, KnK Zing, etc.
etc.)
also allow for cutting your
own images, and using your own
system fonts
and also load SVG files and have
them all cut. But you are NOT
required to be ONLINE to get your
machines to cut.